1. INTRODUCTION
Stress concentration at the crack tip is considered one of the most important issues in linear fracture mechanics. Determining the stress distribution at the crack tip depends on calculating and determining a parameter called the stress intensity factor (SIF). This parameter can not only determine the amount of stress at the crack tip and its perimeters but also indicates the condition of the material against the crack. SIF is regarded as one of the important ones in the theory of linear fracture mechanics. Stress intensity factors for different loads and geometries are provided in the handbooks. Griffith first proposed the relationship between sample fracture stress and crack length in 1920[1]. He performed stress analysis on an elliptical hole as an elliptical crack that was growing unstably. Griffith was the first to formulate and present a theory of crack growth based on the criterion of energy conservation. He is the founder of modern fracture mechanics. Accordingly, a crack grows if the strain energy resulting from its growth is equal to or greater than that of the surface energy of the material.
Irwin[2] introduced a new crack growth criterion as an energy release rate based on the Griffith energy criterion that could be used more by engineers. Then, Westergaard[3] suggested a method for determining the stress distribution and displacement at the crack tip in 1938 by introducing the complex functions. Then, Irwin found that stress distribution obtained at the crack tip by Westerguard can be expressed based on a parameter called the stress intensity factor. Williams[5] used another technique to obtain the stress distribution at the crack tip. Fracture mechanic investigations have continued ever since. Oliver[6] was one of the first researchers who used the finite element method to model cracks after introducing this method in engineering. He used the mesh removal technique to model the perforation in the sample and simulated the crack. Rashid[7] used the moving meshes technique and the replacement of meshes to model cracks.
In 1999, Moes et al.[8] used a mesh-free method for simulation and solved the problems of the previous methods. The first use of software such as Abaqus for crack simulation was proposed by Hang et al.[9]. In the extended finite element method (X-FEM), the software can calculate the stress intensity factor by creating a detachable surface in the sample and defining elements at the crack tip. Zohali and Fariba[10] introduced a relation to determine the stress intensity factor in an edge crack under concentrated loading based on the distance from the loading point using the Abaqus software. Evans and Luxmoore[11] determined the full equations for stresses and displacements around a central crack in an infinite plate subjected to uniaxial and biaxial tension using the Westergaard stress function.
Hyde and Warrior[12] presented an improved method for determining photoelastic stress intensity factors using the Westergaard stress function. Cirello et al.[13] developed a numerical procedure that combines two hybrid finite element formulations to analyse the stress intensity factors in cracked perforated plates with a periodic distribution of holes and square representative volume elements. The accuracy of the method in predicting the stress intensity factor was verified by a comparison with experimental measurements carried out by a photoelasticity method and by commercial finite element software.
The present study investigates the effect of geometric changes on the stress distribution and stress intensity factor in an edge-cracked plate. For this purpose, a hole-free plate with an edge crack was analysed with Abaqus software, and the stress distribution and stress intensity factor were calculated. Furthermore, Westergaard analytical method was used to validate the results, and the numerical and analytical results were compared to each other, which showed good consistency. Then, a plate with an edge crack and a hole near the crack tip was analysed, and the effect of the distance of the hole centre from the crack tip on the stress distribution and on the stress intensity factor was investigated. Additionally, a plate with an edge crack and two aligned holes were analysed and the distance of holes from the crack tip and the radii of the holes were evaluated according to their effects on the stress distribution and stress intensity factor.
2. MODEL DESCRIPTION
The model investigated here consists of a finite rectangular plate with an edge crack. This plate is under uniform uniaxial loading at the top and bottom edges. Figure 1 shows a schematic of the plate with the edge crack. Also, the plate is made of SAE 304 stainless steel.
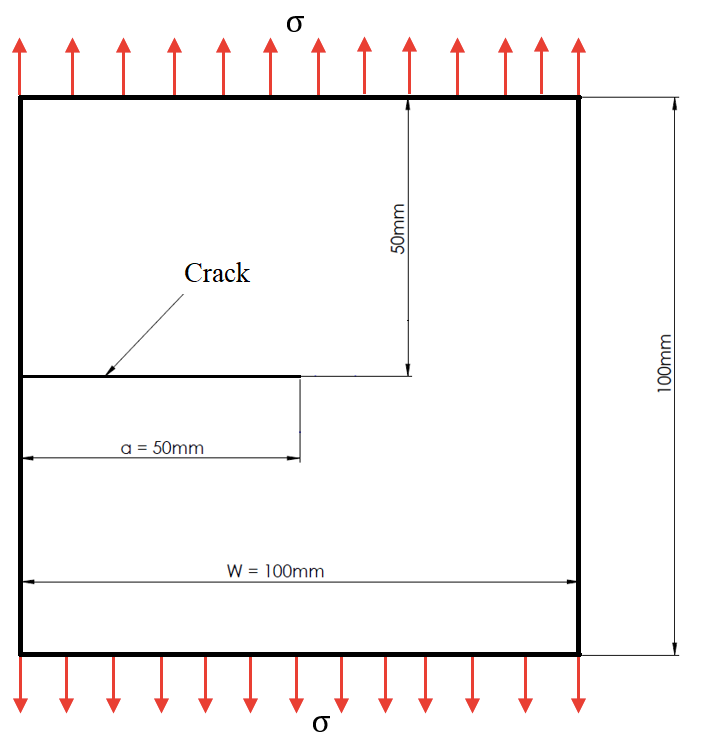
Fig. 1 The plate schema with an edge crack
3. THEORETICAL AND NUMERICAL ANALYSIS OF A PLATE WITH AN EDGE CRACK
The procedure for computing the stress state near a crack tip was established by Westergaard[3]. The process based on the Airy stress function concept is used in its Cartesian form. The complex stress function Z is defined as follows:
(1)
(2)
In Eq. (1), Re Z and Im Z are the real and imaginary parts of the Z function, respectively. Also, Eq. (2) represents the general form of a complex number. If the Z is an analytic function, we can use the Westergaard stress function. The Westergaard stress function is defined as follows:
(3)
In Eq. (3) and are obviously first and second integrals of complex functions Z(x), so that:
(4)
From the Cauchy-Reimann conditions, i.e.
(5)
Therefore, the plane stress equations are as follows:
(6)
The stress components ahead of a crack tip for mode I of loading are as follows:
(7)
Eq. (7) calculates the stress field ahead of a crack tip, in which σx, σy and τxy are the stress components in the direction of the x-axis (in the direction of the crack), in the direction of the y-axis, and in the xy plane, respectively. These equations are approximations, limited to an area close to the crack tip. The distance r and angle θ are as defined in Figure 2.
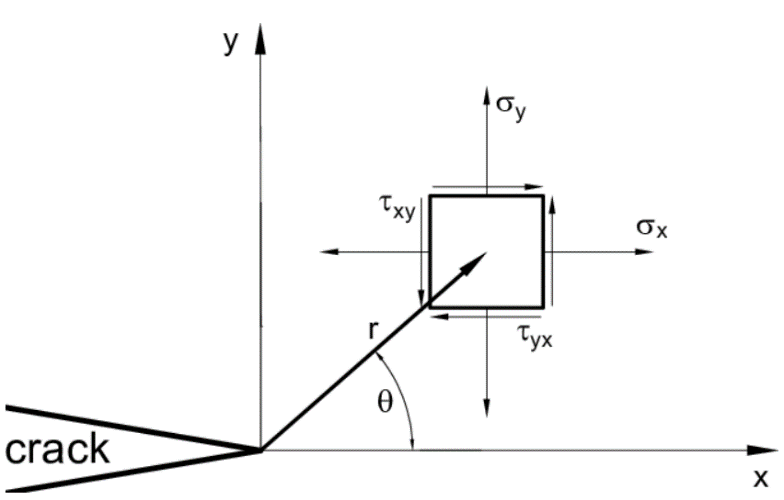
Fig. 2 Definition of the coordinate axis ahead of a crack tip
The KI parameter in Eq. (7) is called the stress intensity factor (SIF), indicating the singularity of the stress at the crack tip. The KI equation for an edge cracked plate under uniaxial loading is as follows[3,11,14]:
(8)
Where Y is called the geometry factor, signifying the geometry of a crack system in relation to the applied load and σ is the applied load at the plate edge:
(9)
Where a and W represent the crack length and plate width. Table 1 displays the stress values σx, σy and the stress intensity factor KI calculated by Eqs. (7) and (8) for different distances from the crack tip (r), θ=0 and σ=1 MPa.
Table 1 The stresses σx, σy and KI calculated by the theoretical analysis
| 31.490 | 35.3 | 0.2 |
| 18.181 | 35.3 | 0.6 |
| 14.083 | 35.3 | 1 |
| 11.902 | 35.3 | 1.4 |
| 9.958 | 35.3 | 2 |
| 9.090 | 35.3 | 2.4 |
| 8.416 | 35.3 | 2.8 |
Also, Figure 3 shows the stress values σx , σy and y versus distance r from the crack tip for θ=0, calculated by Eq. (7). According to Eq. (7), it is clear that for θ=0, σy = σx and the y will be zero.
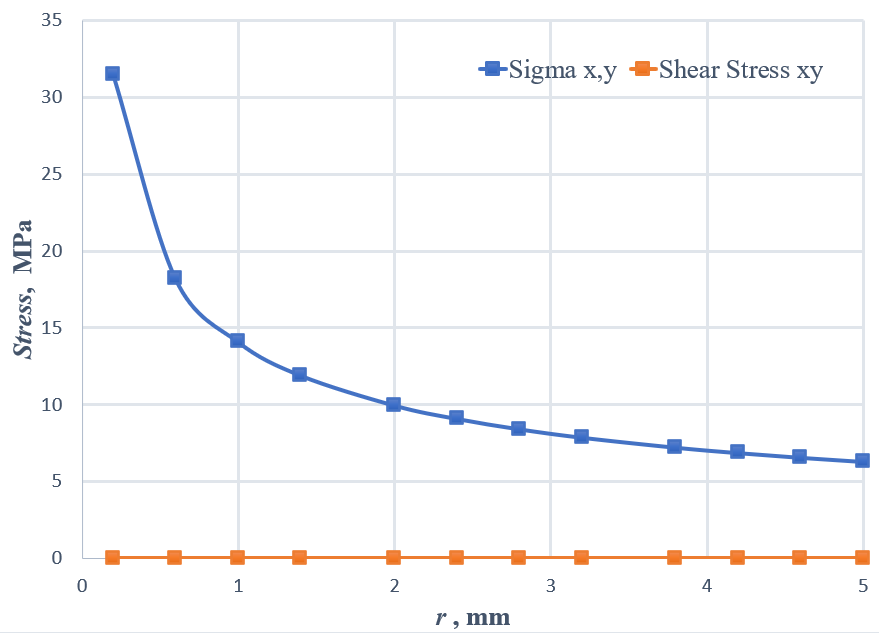
Fig. 3 The plot of stress values versus distance r from the crack tip calculated by the theoretical method for θ=0
The Abaqus FEA software was used for finite element simulation. The contour integrals technique is used for calculating the stress intensity factors of the crack. First, the plate was modeled and then meshed in the software. 6600 quadratic elements of CPS8R type are used for model meshing. Further, singular elements were used around the crack tip. Figure 4 shows the view of the entire element`s plate and the crack tip area.
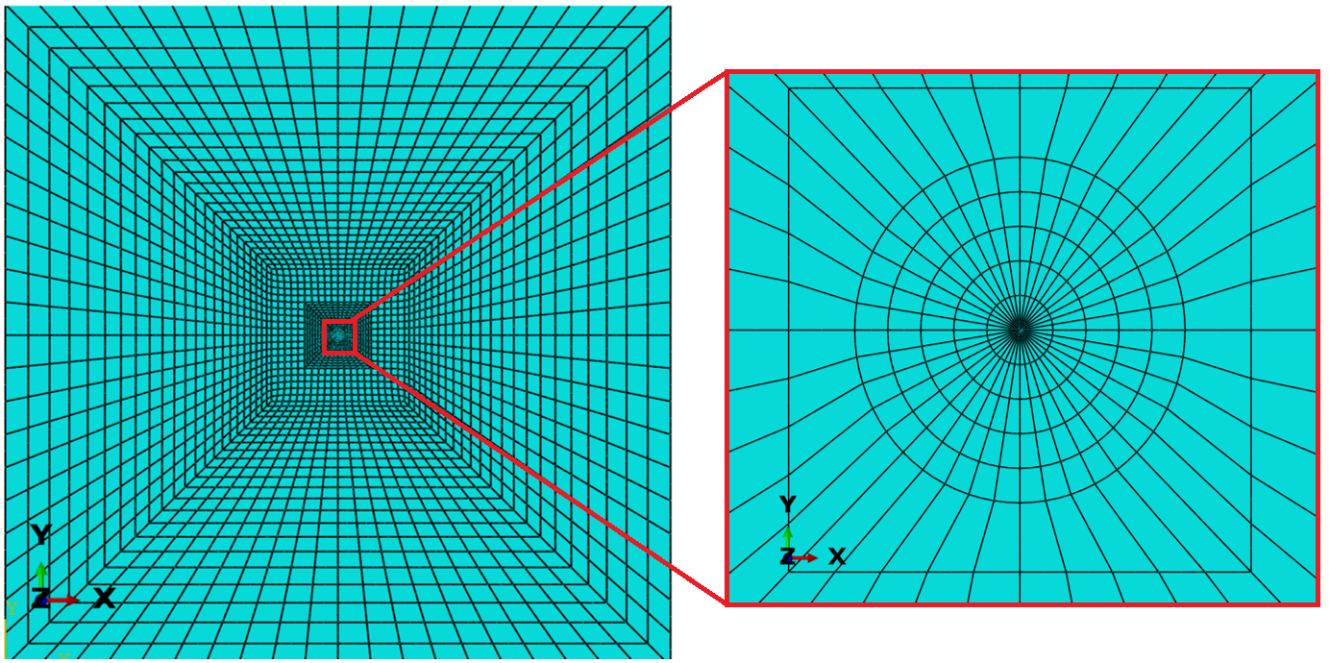
Fig. 4 The finite element mesh of the plate without a hole
The mechanical properties of SAE 304 stainless steel assigned to the model are represented in Table 2.
Table 2 Mechanical properties of SAE 304 stainless steel
Figure 5 shows the Von Mises stress contour near the crack tip with the maximum stress indicated.
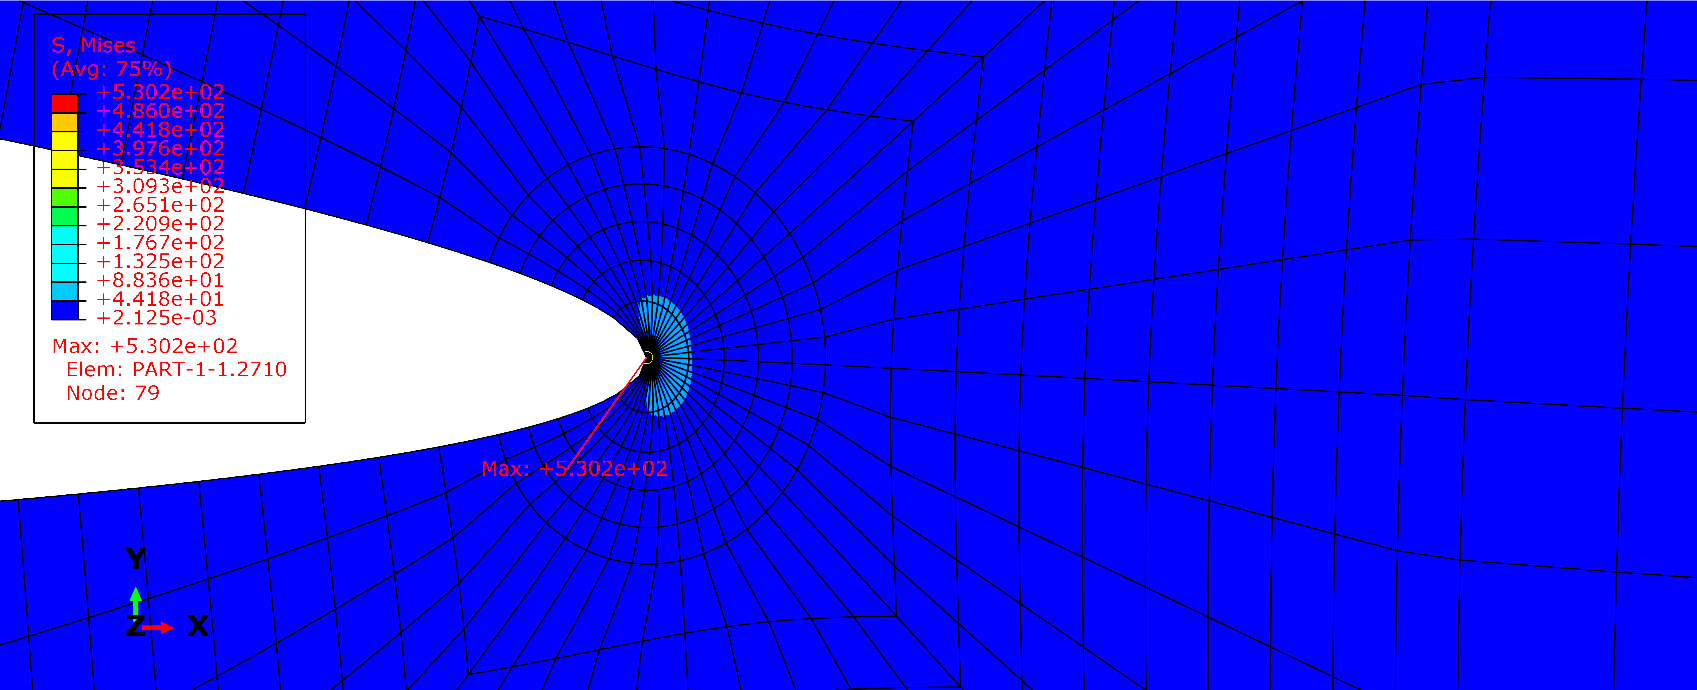
Fig. 5 The Von Mises stress contour plot of the plate without a hole
Also, Table 3 displays the stress σy and stress intensity factor KI obtained by the numerical analysis with Abaqus for different distances from the crack tip (r) and θ=0.
Table 3 The stress σy and KI calculated by the numerical analysis
| 0.2 | 36.434 | 31.619 |
| 0.6 | 36.434 | 18.366 |
| 1 | 36.434 | 14.163 |
| 1.4 | 36.434 | 11.884 |
| 2 | 36.434 | 9.985 |
| 2.4 | 36.434 | 8.726 |
| 2.8 | 36.434 | 8.239 |
The results of stress and stress intensity factors analyzed by the theoretical and numerical methods (using Abaqus) were compared to determine the accuracy of the results. Table 4 compares the stress values and stress intensity factors using theoretical and numerical analysis and the error is calculated. Figure 6 compares the stress σy values versus distance r in the methods. The calculated errors in Table 4 indicate that the accuracy of the numerical results is satisfactory and thus, modeling conditions such as the size of the elements are used for subsequent numerical analyses.
Table 4 Comparison between the theoretical and numerical results
| Error (KI) % | Error (σy) % | |
|---|---|---|
| 0.2 | 3.21 | 0.41 |
| 0.6 | 3.21 | 1.01 |
| 1 | 3.21 | 0.56 |
| 1.4 | 3.21 | 0.15 |
| 2 | 3.21 | 0.26 |
| 2.4 | 3.21 | 4.01 |
| 2.8 | 3.21 | 2.11 |
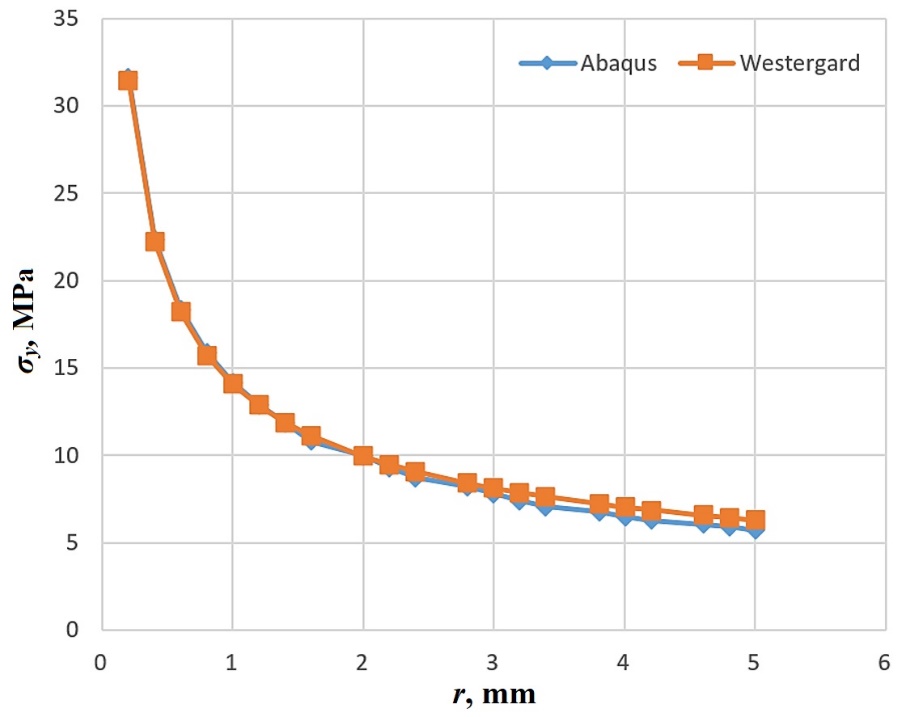
Fig. 6 The plots of the stress σy versus distance r from the crack tip calculated by theoretical and numerical methods
4. FINITE ELEMENT ANALYSIS OF A PERFORATED PLATE WITH AN EDGE CRACK
The effect of the existence of a hole near the crack tip on the stress distribution was investigated, as well as the value of the stress intensity factor. A plate with a hole on the x-axis with a distance of S from the crack tip and a radius of 5 mm is modeled in Abaqus software. Figure 7 shows the dimensions and the elements view of the plate. All the conditions and sizes of the element in this simulation are similar to the finite element analysis of the previous section. Further, Figure 8 displays the Von Mises stresses in the model near the crack tip.
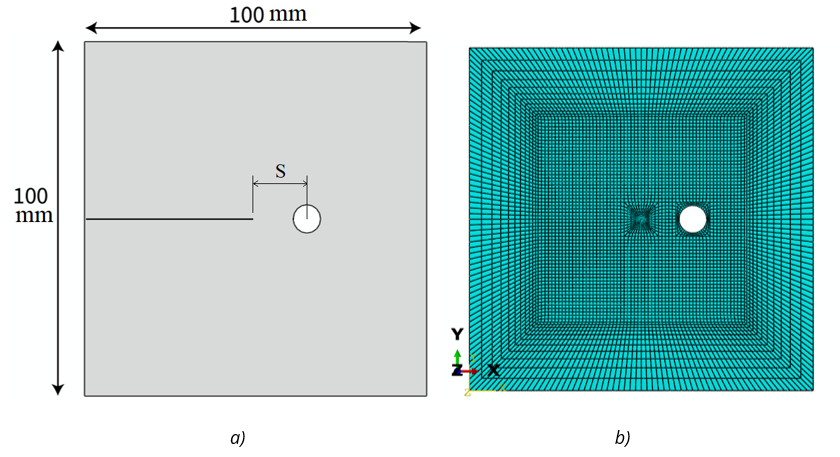
Fig. 7 a) The dimensions of the perforated plate, b) the finite element mesh of the perforated plate
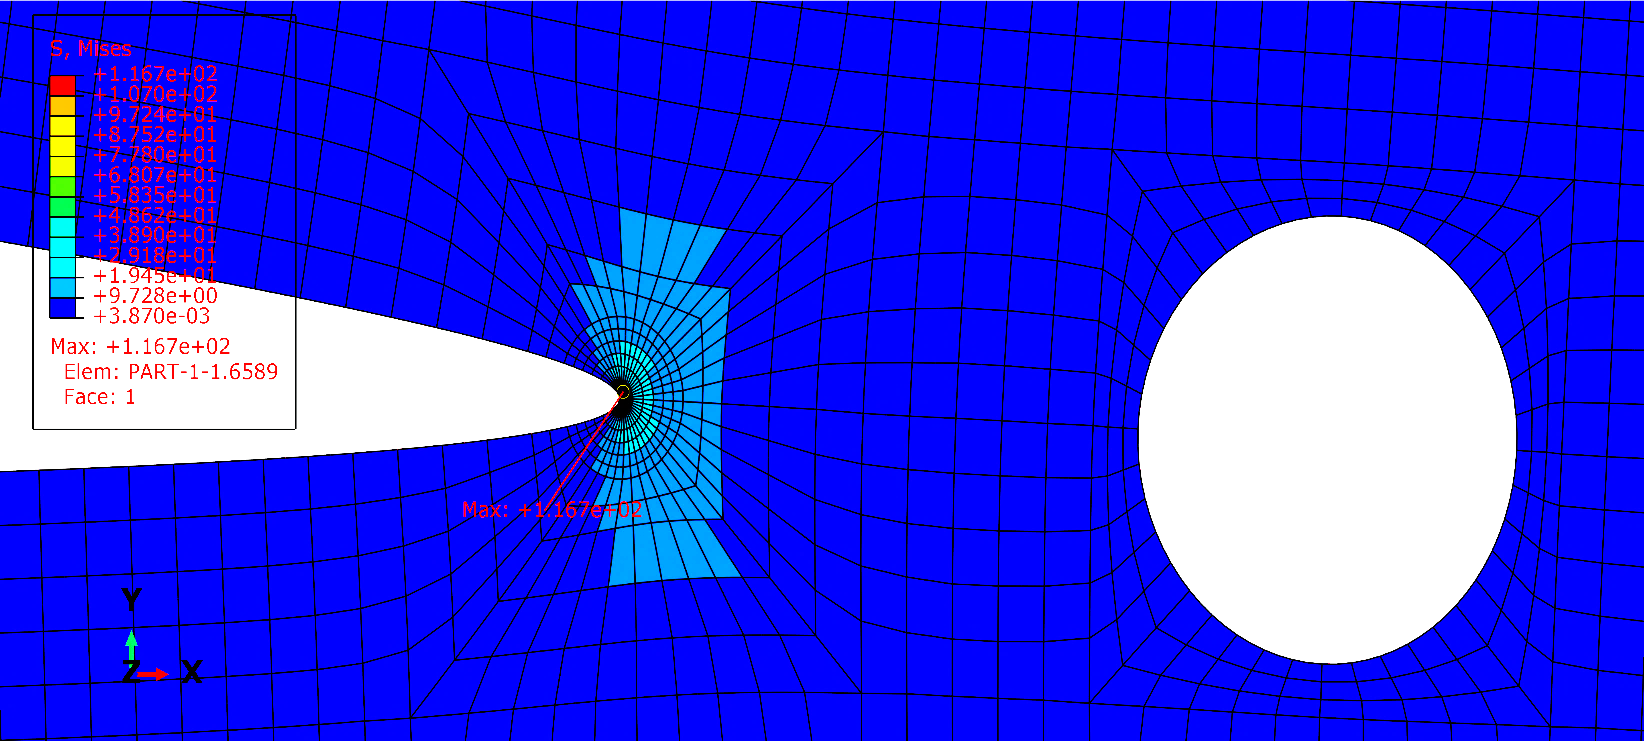
Fig. 8 The Von Mises stress contour plot of the plate with one hole
Tables 5 and 6 compare the stress σy and stress intensity factor KI for different values of distance S, respectively. Also, Figure 9 displays the effect of distance S on the stress value σy. It is clear from the results of Table 5 that by increasing the distance S (the hole is farther away from the crack tip), the stress value at the crack tip decreases and causes a decrease in the value of σy. Also, with the increase of r (distance from the crack tip), the position of stress measurement moves away from the place of stress concentration, and the value of σy should decrease.
Table 5 The stress σy for different values of distance S (in the plate with one hole)
Table 6 The stress intensity factor KI for different values of distance S (in the plate with one hole)
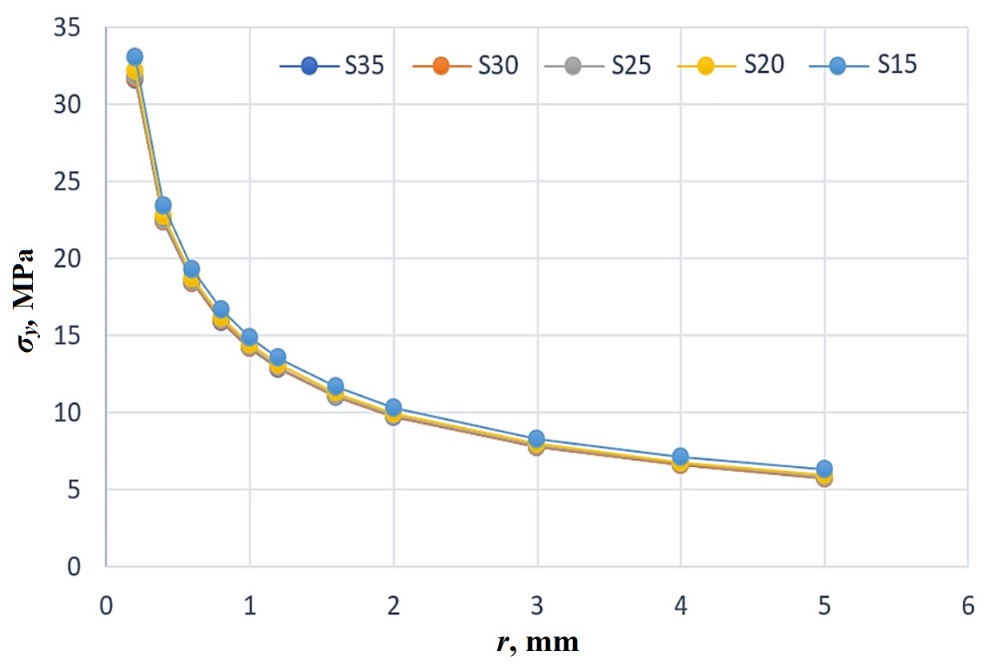
Fig. 9 The plots of the stress σy versus distance r from the crack tip for different values of distance S (in the plate with one hole)
From the above results, it can be concluded that by increasing the distance of the hole from the crack tip (S), the stress intensity factor KI and stress σy decrease. The three-dimensional diagram of σy in terms of distance r and S is shown in Figure 10. Also, the polynomial relationship resulting from the curve fitting extracted from the Matlab software is also shown in this figure. According to this plot, the minimum stress value occurs at r=5 mm and S=35 mm, and the maximum at r=0.2 mm and S=15 mm.
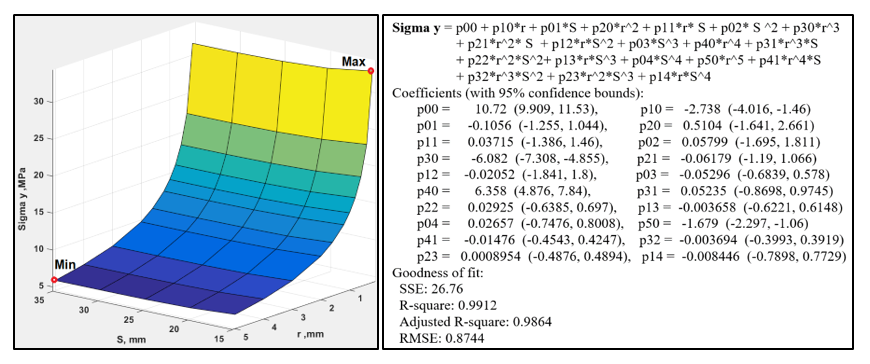
Fig. 10 The 3D plot of the stress σy versus distances r and S (in the plate with one hole)
5. FINITE ELEMENT ANALYSIS OF A PLATE WITH AN EDGE CRACK AND TWO HOLES (WITH DIFFERENT DISTANCES FROM THE CRACK TIP)
In this section, a plate with an edge crack and two aligned holes is investigated. The horizontal position of the two holes is the same, and the aim is to investigate the effect of the horizontal distance S (the horizontal distance of the center of the circles from the crack tip) on the stress value σy and the stress intensity factor KI. The vertical distance of two holes from the crack tip is equal to 20 mm.
Figure 11 shows the dimensions and elements view of the model. Also, Figure 12 shows the Von Mises stresses in the model near the crack tip for S = 0.
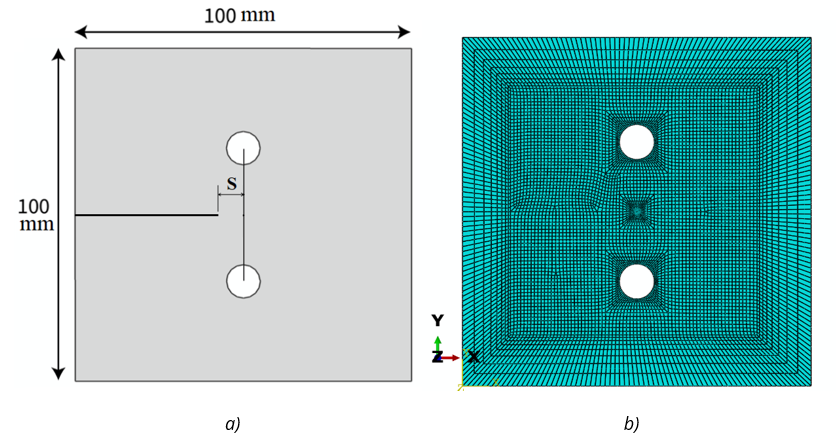
Fig. 11 a) The dimensions of the plate with two holes, b) the finite element mesh of the plate with two holes (S = 0)
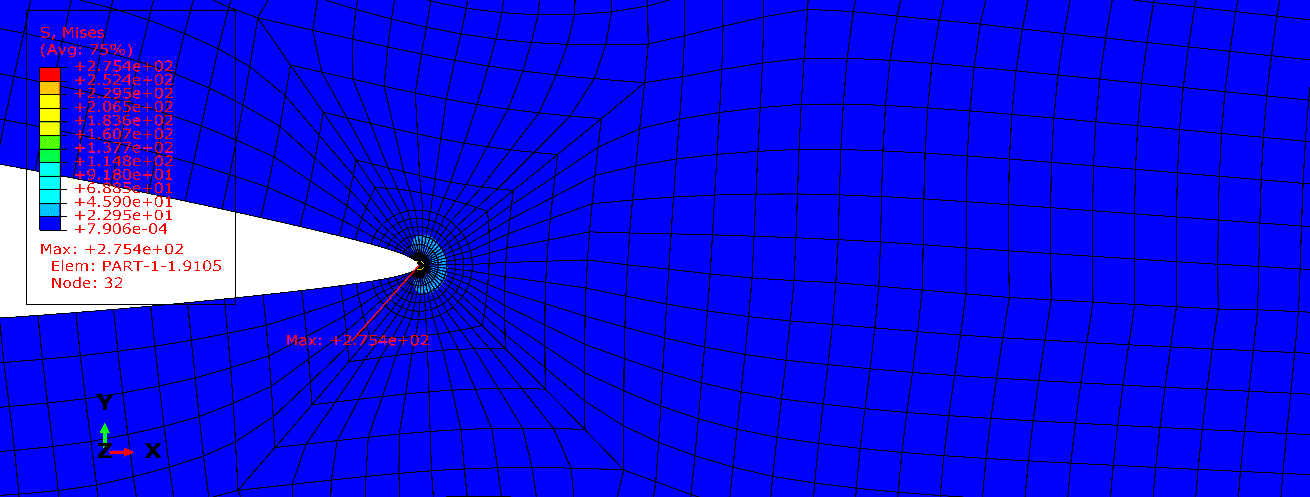
Fig. 12 The Von Mises stress contour plot of the plate with two holes (S = 0)
Tables 7 and 8 compare the stress σy and stress intensity factor KI for different values of distance S, respectively. Also, Figure 13 displays the effect of distance S on the stress value σy. As shown in Table 7, the existing hole increases the stress value σy near the crack tip in the plate compared to the hole-free plate (for r=0.2, 0.4, 0.6, 0.8 mm). However, the existing hole decreases stress σy in the areas farther from the crack tip compared to the hole-free plate. A similar trend is observed in Figure 13. In addition, the results of Table 8 show that the presence of two holes in the plate increases the stress intensity factor KI compared to the hole-free plate.
Table 7 The stress σy for different values of distance S (in the plate with two holes)
Table 8 The stress intensity factor KI for different values of distance S (in the plate with two holes)
| without holes | S=35 mm | S=30 mm | S=25 mm | S=20 mm | S=15 mm | S=0 mm | |
|---|---|---|---|---|---|---|---|
| 36.43 | 37.29 | 37.55 | 38.02 | 38.61 | 39.20 | 37.53 |
|
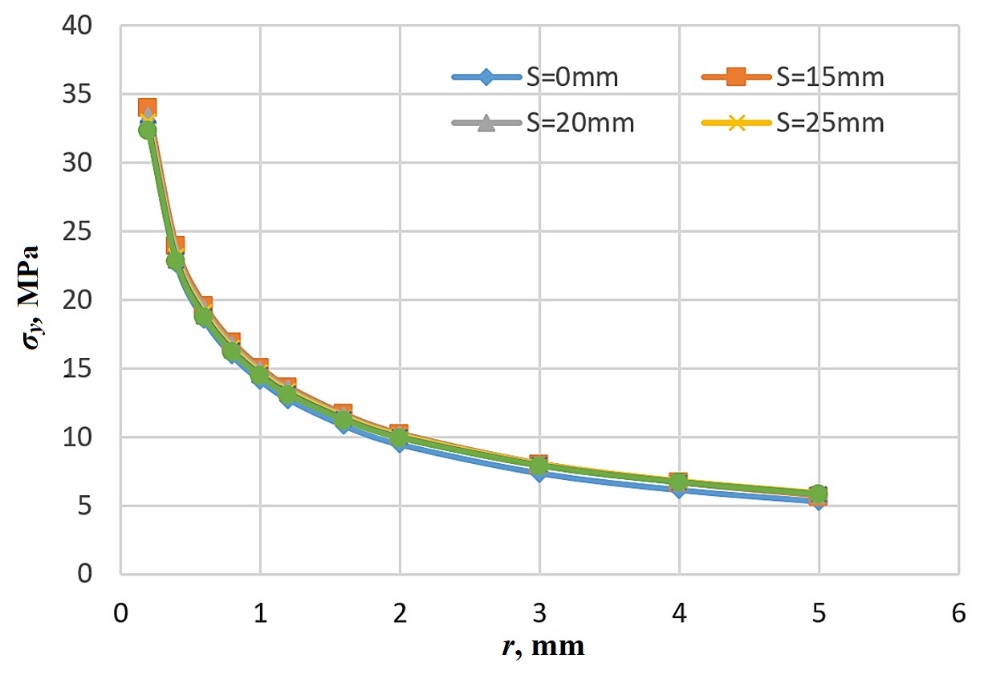
Fig. 13 The plots of the stress σy versus distance r from the crack tip for different values of distance S (in the plate with two holes)
6. FINITE ELEMENT ANALYSIS OF A PLATE WITH AN EDGE CRACK AND TWO HOLES (WITH DIFFERENT RADIUS)
In this section, a plate with an edge crack and two aligned holes is investigated. The horizontal position of the two holes is the same and S is equal to zero. The aim is to investigate the effect of the radius of the holes on the stress value σy and the stress intensity factor KI. Figure 14 shows the dimensions and elements view of the model. Figure 15 shows the Von Mises stresses in the model near the crack tip for radius R = 10 mm.
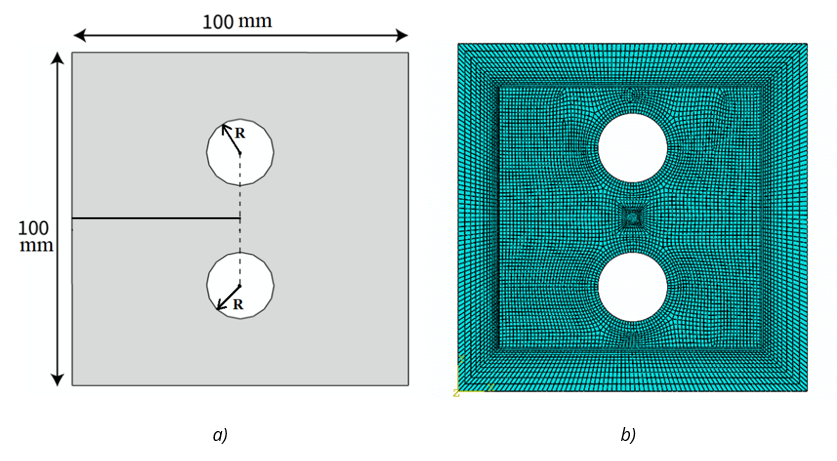
Fig. 14 a) The dimensions of the plate with two holes (S=0), b) The finite element mesh of the plate with two holes (S=0)
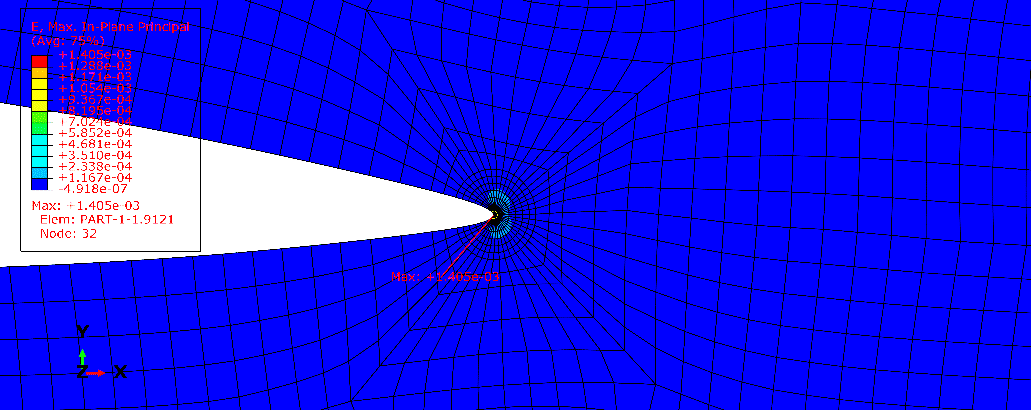
Fig. 15 The Von Mises stress contour plot of the plate with two holes (S=0, R=10 mm)
Tables 9 and 10 show the stress σy and stress intensity factor KI for different values of radius R, respectively. Figure 16 displays the effect of radius R on the stress value σy. As shown in Table 9 and Figure 16, at the area near the crack tip with increasing radius of the hole, the value of stress σy increases (for r=0.2, 0.4, 0.6, 0.8, 1 mm) while at the area farther from the crack tip, the stress value σy decreases with increasing radius of the holes. It is also observed in Table 10 that with increasing the radius of the holes, the stress intensity factor KI also increases.
Table 9 The stress σy for different values of radius R (in the plate with two holes)
Table 10 The stress intensity factor KI for different values of radius R (in the plate with two holes)
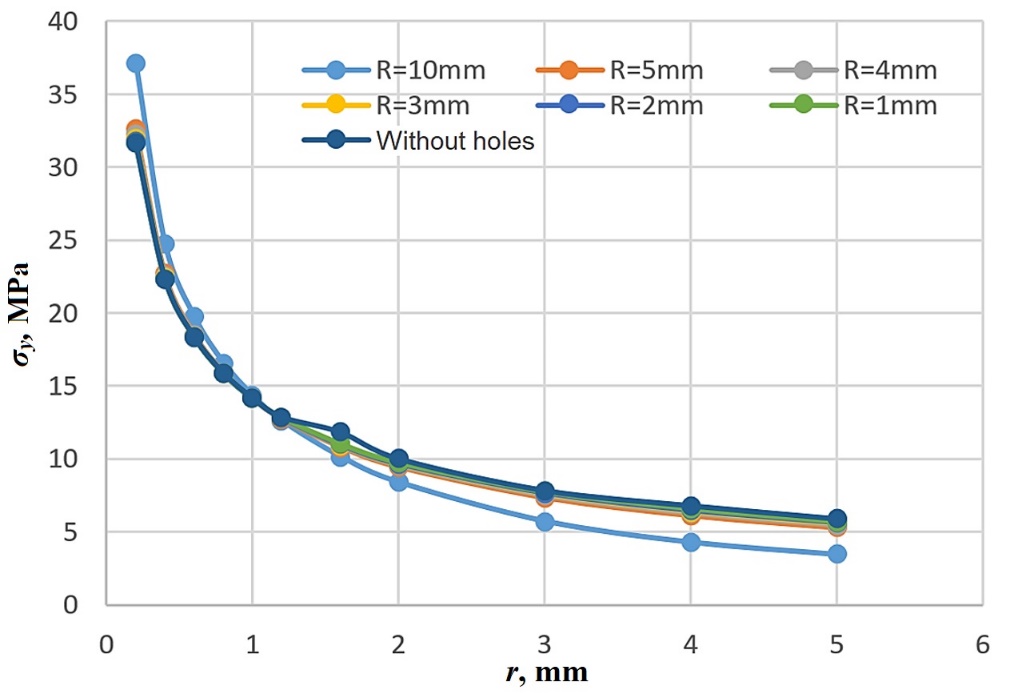
Fig. 16 The plots of the stress σy versus distance r from the crack tip for different values of radius R (in the plate with two holes)
7. CONCLUSION
In this study, the effect of the hole on the stress distribution and stress intensity factor of a plate with an edge crack was investigated. Based on the obtained results, several important findings are summarized:
The stress intensity factor KI and stress σy decrease when the distance of the hole from the crack tip increases in the plate with one hole in front of the crack tip. Because the closer the hole is to the crack tip, the more it affects the stress distribution around the crack tip, the stress intensity factor will be higher as a result.
In the case of a plate with two holes with different distances from the crack tip, the presence of the holes in the plate near the crack tip (for r=0.2, 0.4, 0.6, 0.8 mm) increases the stress σy compared to a plate without a hole. However, in areas farther from the crack tip, the presence of the holes reduces the value of stress σy compared to a plate without a hole.
It can be concluded that the presence of the hole in the plate increases the stress intensity factor KI compared to the hole-free plate. For example, in the case of a plate with two holes with a radius of R=10 mm, the value of the stress intensity factor is about 18% higher than the plate without holes.
In the plate with two holes with different radii, the stress σy increases when the hole radius increases near the crack tip (for r=0.2, 0.4, 0.6, 0.8, 1 mm). While at distances farther from the crack tip, the stress σy decreases with increasing hole radius. Also, with increasing the hole radius, the stress intensity factor increases.
In general, according to the obtained results, it can be said that the presence of the hole in front of a crack causes a change in the geometry and stress distribution around the crack tip, which causes a change in the stress intensity factor. These changes are a function of the number, radius, and distance of the holes from the crack.
